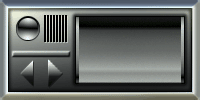
The Photoshop Guru's Handbook - "Creating the NUI" Part 2 - Nutz & Bolts (mini Interface project) Layer 13 a ) Create a new layer. b ) Now we're going to create two arrow heads. Start by drawing a perfect square selection. Start the selection on the left edge, just below the horizontal bar that's in the middle. The height of the square should only take up about 2/3rds of the space that's between the bar and the bottom inner edge of the Interface. Try using a perfect square 30x30 pixels to start with. c ) Fill the selection with black, and Deselect it. d ) Hit Ctrl + Shift + T (PS5+ users go to Edit/Transform/Numeric). Untick all the options except for Rotate. Set the rotation angle to 45o. Click OK to apply the Transform. e ) If the left half of your diamond shape is not aligned directly under the button, use the Move tool and move it there now. Try to leave as much space above the diamond as there is below it. f ) Use the Rectangle selection tool and select just the right half of the diamond. If you have to, zoom in close to line up the middle. Don't worry too much about that though, it's not that crucial for this 'exercise'. Just select as best you can. g ) Once you have your selection, pick the Move tool. Hold down the Shift key and drag the selected area to the right. Try to put as much space between the arrows as the width of one of them. So if the arrows are 10 pixels wide, put 10 pixels of space between them. Now Deselect. If they aren't aligned in the center of the space below the bar, just use the arrow keys to nudge them over until they're centered. Once they're centered, use the Move tool and arrow keys and nudge this layer 1 pixel right and 1 pixel down. h ) Set this layer's Blend mode to Overlay, and the Opacity to 50%. Layer 13 COPY a ) Duplicate Layer 13. And while you still have the Move tool picked, nudge this duplicate layer back up 1 pixel and left 1 pixel. This returns the arrows to their original position. Layer 13 got moved because it will be our shadow layer. b ) We're going to fill these duplicate arrow heads with a Linear gradient. But instead of selecting them to protect the layer's transparent area, we're going to use the 'Preserve Transparency' option for this layer. Essentially this does the same as selecting the layer's contents, but without all the hassle. So now, click in the small check box on the top left of the layers palette that says Preserve Transparency. c ) Now fill the arrows with a white to black Linear gradient, going from top to bottom. Don't forget to hold the Shift down at the same time, to make sure your gradient is straight. d ) Set this layer's Blend mode to Hardlight, and the Opacity level back up to 100%. (remember we turned it down for Layer 13)  This should be what you have with the addition of Layer 13 COPY. Pretty spiffy huh? One more step to go and we're done! This should be what you have with the addition of Layer 13 COPY. Pretty spiffy huh? One more step to go and we're done!To the Top Back to "Nutz & Bolts" - Page 5 - |
| "The Photoshop Guru's Handbook" ™ and all contents of this site are copyright 96/00 Mark Anthony Larmand - (aka theKeeper) all rights reserved. |