The Photoshop Guru's Handbook - "Creating the NUI" Part 2 - Nutz & Bolts (mini Interface project) Layer 4 a ) Create a new layer. b ) Make black the foreground colour. Stroke the selection by 1 pixel, Inside. c ) Change the foreground colour to white. Now Stroke the selection again, but by 3 pixels, and on the Outside. d ) Invert the selection. Apply a Gaussian blur of 1.5 pixels. e ) Invert the selection again and Stroke it with white, 1 pixel on the Outside. f ) Set this layer's Blend mode to Overlay. DON'T DESELECT. Layer 5 a ) Create a New layer. b ) Stroke the selection with black, 2 pixels on the Inside. c ) Apply a Gaussian blur of 1.5 pixels. NOW deselect.  This should be what you see so far, with the addition of Layer 5. This should be what you see so far, with the addition of Layer 5.Layer 3 COPY a ) Click on Layer 3 and Duplicate it. b ) Drag it to the top of the layers palette, above layer 5. c ) PS4 users hit Shift + Ctrl + T (hold them all at once), PS5+ users go to Edit/Transform/Numeric). Untick all of the options except for Scale. Type in 60% for width, and 80% for height. (make sure it's on percent and not pixel) Hit OK to apply the Transform. d ) Now hit Ctrl + I to invert the gradient colours. (This is not the same as flipping the layer vertically) e ) Select the Move tool. Now hold down the Shift key. While you're holding shift, drag the rectangle to the right until it's right edge is the same distance from the lip of the Interface as the top and bottom are. f ) Set the layer's Blend mode to HardLight. 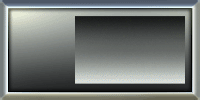 This should be what you see after finishing Layer 3 COPY. Again, if yours isn't looking very close to this, delete the layer and repeat the steps. This should be what you see after finishing Layer 3 COPY. Again, if yours isn't looking very close to this, delete the layer and repeat the steps.Layer 6 a ) Ctrl + click the Layer 3 COPY layer to select it's contents. Then create a New layer. b ) Make the foreground colour white, and Stroke the selection by 4 pixels, on the Inside. c ) Now apply a Motion blur - Filter/Blur/Motion Blur. Set the Angle to 90, and the Distance to 20. Apply it. d ) Set the layer's Blend mode to Difference. DON'T DESELECT. 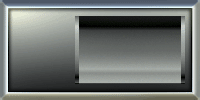 You should now have something like this after Layer 6. You should now have something like this after Layer 6.To the Top Back to "Nutz & Bolts" - Page 2 - |
| "The Photoshop Guru's Handbook" ™ and all contents of this site are copyright 96/00 Mark Anthony Larmand - (aka theKeeper) all rights reserved. |