|
|
| Xtreme Textures The Finished Product Now we'll add some character to our Base Texture, to give it a finished look. When we're done with these steps you will be able to use this texture pattern for anything you like. Once you've saved this texture to your hard drive, you can even continue to create variations of it by editing it further on your own. |
|
Step 4 BG 1 Create a New Layer above the Layer 1 copy layer, and name this New Layer BG 1. Now hold down your Alt/Option key on your keyboard and open the Layer Menu at the same time. Choose the Merge Visible option, while still holding down the Alt/Option key. What this is doing is merging our Layer 1 and Layer 1 copy layers onto the new empty BG 1 layer. As the option says, it will merge any and all visible layers onto this new empty and active layer. Which for us is the BG 1 layer.We've now created a seamless texture pattern that can be used as a web page background, to fill text and shapes with, or as a surface texture for texture mapping. For our purposes here though the texture is still a little too blunt looking. So what we'll do now is apply a few of Photoshop's native filters to it, to give it a look that is a bit more versitile in it's applications. |
|||
|
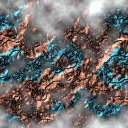
Step 5 BG 1 gets more character Create a New Layer above the BG 1 layer and set it's Blend mode to Lighten. Name this new layer BG Overlay. Open the Filter Menu and apply the Clouds filter to this layer. Then apply the Difference Clouds to it about 5 times. Now apply the Auto Levels filter to the clouds. Once you've applied Auto Levels you should immediately see a patch of fluffy white clouds appear above the texture on the BG 1 layer.
It is these fluffy clouds, on the BG Overlay layer, that will help to give our finished texture a shiny quality when we're done. If you want to, go ahead and play around with the various Blend Modes for the BG Overlay layer. It might be a good idea to Save at this point. Do that right now before we continue. Name this Texture colored_tiles. We'll be refering to it in the next Session, Session 8b ("Metallic Tiles - part 2"). |
|||
| Step 6 BG 1 comes out of his shell There's just a few more things left to do now to finish creating our final Texture. One of those things is to Merge the BG 1 and BG Overlay layers together on a new empty layer, just like we did before when we created the 'BG 1' layer in Step 3. Before we do the Merging of these layers though, turn OFF the eyes for the Layer 1 and 'Layer 1 copy' layers. If they're left on they will get merged onto the new layer along with our two BG layers, and we don't want that. Ok, now with only the BG layer's eyes turned on, create a New Layer above the BG Overlay layer. Make sure that the new empty layer is active, by clicking on it. Then hold down the Alt/Option key and open the Image Menu and choose Merge Visible. Now we should have a combination of the two BG layers on our new layer, right? It is this new texture that will become our final texture pattern. So why not name this new layer Final Texture. |
|||
|
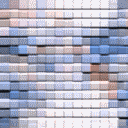
Step 7 Turning Textures into Tiles At this stage, if you were going to continue experimenting with Photoshop's various filters, it would be wise to create a duplicate back-up copy of your Final Texture layer.Ok, the native Photoshop filter that we want to use is called Patchwork. You can find this filter in the Filter Menu under Texture / Patchwork. Apply this filter now to your layer using the following settings: The effect you end up with should look something like old bathroom or floor tiles. It should have a variety of colors in it also. But it will not yet look metallic in nature. That part will be done in the following Session (Part 2).
That's it! We're done! This final texture will be the one we use to create the shiny tile effect you see in the header image at the start of this Session, on the first page. Which we will continue on with in Session 8b. Save your document now one last time. Recap of this Session: In this Session we have been experimenting with just a few various ways to create a texture pattern from scratch. Just so you know, the steps used by me to create the texture effect you see on the header image, (on the starting page of this Session), were discovered completely by experimentation. Once I discover a way of making a specific type of texture, I go back and review my layers and their settings to figure out how I did it. Then I write down the steps I used. This way I don't have to commit them all to memory, and if I want, I can also then use these steps to create an Action for my Actions Palette that will recreate the exact same effect everytime, with just one click of a button. Try it! |
| Well, that will wrap-up Part 1 of this Session for us folks. I hope this has been informative for you all, and I look forward to seeing you again when we continue with Metallic Tiles - Part 2. For now, Onward'n'Upward! theKeeper |
| "The Photoshop Guru's Handbook" ™ and all contents of this site are copyright 96/00 Mark Anthony Larmand - (aka theKeeper) all rights reserved. |