 |
|
| Session 9 Page 2 Transparency for the Web "Now you see it, now you don't!" |
| 2) "Now you see it..." The Magician's props: As of yet, we are not able to make Jpg images with transparency, but there are people working on that one. We do however have the ability to create transparent (or masked) areas in our Gif images. I won't go into the specifics here of how transparency is possible with the Gif format. That in itself can take up an entire book!But what this also means is that you no longer have to just create images that have four corners. You can use any shape you wnat now! And you can put these images anywhere you want on your web page too, without covering up the background of your page. Let's move on now and see this in action. Ok for our example i'm going to be using an image that has not only a square shape to it, but also has a circle extending beyond the lower right corner of the square. This will show you how transparency can be most useful to us. 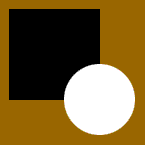 Take a look at the image to the right. Notice how i've added a background colour to it so you can see just what part of the image we want to hide or mask from the visitor to our web page. There are a couple of ways that i myself mask out image backgrounds. The first one is to remove the background colour when you are in the Gif89a plugin, and about to save your image to your hard disk. Take a look at the image to the right. Notice how i've added a background colour to it so you can see just what part of the image we want to hide or mask from the visitor to our web page. There are a couple of ways that i myself mask out image backgrounds. The first one is to remove the background colour when you are in the Gif89a plugin, and about to save your image to your hard disk.This is how we would do that: Say you've just finished your image and are ready to save it as a Gif. The first thing you have to do in Photoshop is to convert your RGB image into an Indexed image. To do this, go up to the IMAGE menu and choose MODE / INDEXED COLOR. When the dialog window opens, you will have a few choices to make. For our purposes here though, we will leave these settings at their defaults. Be careful during this part. When converting to Indexed Color mode, Photoshop will ask you to flatten your image. Make sure you have saved your work as a Photoshop .PSD file first, so you can Revert back to it if you need to make further changes.Click OK to apply the conversion. Now you have an Indexed colour image and are ready to create the transparency in it. TIP: There is a specific palette that was created just for the web. It only has 216 colours, but all it's colours will render exactly the same on any computer or in any web browser. It's called the “216 websafe palette”. If you don't have this palette already, you will find it at a lot of the Photoshop sites on the web. And it's also free! Check in your Photoshop / Palettes folder to see if you have it, or any file named Web.ACO. Any images you do that have a lot of flat or static colour schemes, and are destined for web pages, should be created with this palette instead of the normal 256 or RGB colour palette. |
| 3) "Now you don't!..." Not seeing is believing: Alright, here we are then. We have our Indexed image and are standing on the threshold of a great adventure.
PC users hold the Ctrl key down / Mac users hold the Command (or Apple) key down. You'll notice that the tiny plus sign on the Eyedropper will turn into a minus sign. Click on the colour that you didn't want removed, and it will become non-transparent again. You can click on a colour in either the preview window (zoom in) or in the tiny palette at the bottom.
|
| Ok we're done for this Session. You've just completed one way of creating a Transparent Gif for your web pages. In the next Session "Transparency for the Web (part 2)", we'll discover another way to do this trick. And it just so happens to be the way i use the most.(Gee! What a coincidence huh?!) So until next time... Onward'n'Upward! theKeeper |
| "The Photoshop Guru's Handbook" ™ and all contents of this site are copyright 96/00 Mark Anthony Larmand - (aka theKeeper) all rights reserved. |
