Xtreme Designs
Please keep in mind...
The design we're working on here may not have any real use for you. It is more a study of how to use certain techniques in Photoshop to achieve a given design goal. So pay close attention to the steps & tools that you are using as we go through this Session.
Step 4
Lights Please
Alright so now what we're going to do is to fill in our black shapes with some gradients.
To start with, go down the layers and check on the 'Preserve Transparency' box for each layer with a black shape on it; which should be all of them except the Background layer right?
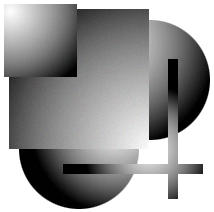
Now start at the top layer and use the gradient tool to fill the shape with either a Linear or Radial gradient. The choice is up to you which one you want to use.
Below is what mine looked like when all my shapes were filled with gradients.
Once all of the shape layers have been filled with gradients, change the Blend Mode for all the shape layers to 'Difference' mode.
Ok, now for the next part, read carefully.
Go down to the 'Background' layer and turn off the eye by clicking on it, so that all you see is the gradient shapes and no background.
Now create a New Layer, and make sure it's at the very top of the palette. Then press & hold the ALT/OPTION key and click on that small arrow at the top of the layers palette to open the Layer menu, then choose 'Merge Visible'. What this will do is merge all the layers in the palette who's Eyes are 'turned on', and put the new merged copy in the new empty layer you just created.
Reminder: This is a great way to flatten a group of layers together without actually having to destroy the originals.
Once this is done, drag the new merged layer to the bottom of the layers palette. Check on the 'Preserve Transparency' Box for the layer and fill it with Black. You can name this layer 'shadow'.
Now DUPLICATE this layer and name it 'negative'. The reason we are calling this new layer 'Negative' is because it will be the one that will make our gradient shapes 'pop out' of our canvas.
To make it do that though we have to change it from black to white. So to do that, either go up to the IMAGE menu and choose ADJUST / INVERT, or just hit CTRL/COMMAND + I on the keyboard.
Now change this layer's Blend Mode setting to EXCLUSION. It's this blend mode setting that will enable the white shape on the layer to produce a 'negative' effect when combined with our gradient shapes on the layers above it.
Just wait... you'll see. :?)
Before we go on, activate the 'shadow' layer again and uncheck the Preserve Transparency Box. Now apply a Gaussian Blur of 1 to 1.5 pixels.
Step 5
The Radical Difference
If you'd like to see just what effect the Negative layer has on the gradient layers, first, turn the Eye OFF for the 'shadow' layer, and then turn OFF the 'negative' layer as well. See the difference? Now turn the Negative layer back on and watch it make the gradient shapes more visible against the white background. Interesting isn't it, hmmm...
Now turn the 'shadow' layer back on and watch how 'it' effects the gradients and the Negative layer together. Very interesting isn't it?
There are SO many various uses for this Blend Mode setting (like the Chrome effect in 'Session 5') that I can't cover them all in just one Session.
Ok, now that we've gotten a better idea of the type of effect we're trying to produce, let's make one small adjustment.
Activate the 'shadow' layer by clicking on it. This layer is actually blocking the Negative layer from producing it's full effect on the gradient layers. That is why the gradient shapes have become more light than dark. So what we're going to do is turn down the OPACITY setting for the shadow layer to let the Negative layer's effects show through more.
Turn the 'shadow' layer's Opacity setting down to 40%.
BUT WAIT A MINUTE! you say... how come the gradients are getting darker? Well actually... they're not. That's just the effect that is produced from the white shape that is on the Negative layer, being set to Exclusion mode. What is really happening is that the gradient shapes are becoming invisible.
Don't believe me? Ok then... let's find out shall we?
( ( ( Click Here To Continue ) ) )
|
