 |
 |
| Session 10 MORE Transparency for the Web Page 2 / Page 1 |
| 2) |
"A little off the top please." If you've ever wondered what kind of uses the Channels could have, this is a good one.Creating a Mask of this image is simple. All we have to do is load our text layers transparency (hold your Ctrl/Command key while clicking the layer's name in the layers palette) and save the selection as an Channel. So load your text layers transparency now and open the Channels Palette. Now click on the square icon at the bottom of the palette and when the channel is there fill the selection with white. Don't deselect just yet though. Now we have our Mask. But... this Mask, when used to create the transparent area in our image will only give us a *semi-transparent* edge. That's because Photoshop, in order to make our image look nicer on screen, has anti-aliased the edges of our mask. Which basically means that it has made the edges of our Mask slightly fuzzy. Well we don't want fuzzy edges do we? So!... let's do one more thing here to make sure our edges are clean in our transparent area. With the selection of our image still there, invert the selection (Select/Invert). Now, with the area outside our image selected, fill the selection with black. Do this once or twice. NOTE: You can fill any selection up to about 4 or 5 times before the selected area is absolutely filled to the brim, and will not show any difference if filled further. This can be useful in making edges quite clean and sharp. But be careful too when doing this, because you may not want all your edges that sharp looking. And for transparent gifs, filling your Mask 4 or 5 times can *cut away* some of your image around the edges. Twice should be sufficient for our image here. |
| 3) |
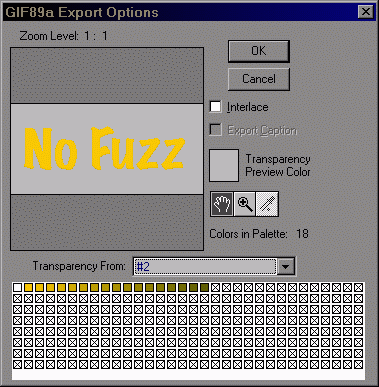
"Presto Chango!" Using the Mask: Ok so now we have our image ready for exporting, using the Gif89a plugin. The plugin is found under the FILE menu and within the EXPORT submenu. It's usually the top name on the list. Before exporting though we have to SAVE our image again as a *non-flattened* .PSD file. Do that now. Then convert your image to Indexed Colour - (Image/Mode/Indexed Color). Let Photoshop flatten the image, and leave the settings for the colour palette at their defaults. Now open the File menu and go down to the Export menu, choose the Gif89a plugin. Once it opens, take notice of the options you have for saving your image. Here's what the dialog box looks like:  Take a look at the drop-down menu in the dialoge box. In that menu you will see the name of the Mask that we created for our image. It's default name is #2. Choose that from the list instead of the "Choose Colors" option. Once you do choose it you'll see your image change right away. The background colour will dissappear leaving your text nice and clean, without a hint of the fuzzies! From this point, just save your image as usual. Keep in mind also that unless your image is over 10 kb in size, there is no need to check-off the "Interlace" option. |
| Ok that about covers it for this Session. You've just learned one of the best ways of creating Transparent Gifs for your web pages. I hope you all find this a useful tool to put in your "bag-o-trix". Until next time... Onward'n'Upward! theKeeper |
| "The Photoshop Guru's Handbook" ™ and all contents of this site are copyright 96/00 Mark Anthony Larmand - (aka theKeeper) all rights reserved. |