 |
|
Session 4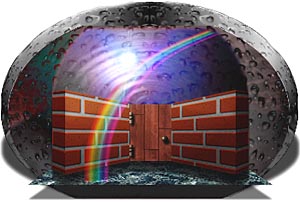 |
"The Fantasy begins..." page 1 / page 2 |
|||
|
Supplies for this Session: |
||||
And:
|
||||
| ||||
|
Preface This month's Session is going to deal with creating simple 3D pictures, not just singular images or objects. But keep in mind that these pictures (or worlds) can be as complex, detailed and "real" as you'd care to make them. It just means more time and imagination will be involved that's all. For the sake of this Example though we will be dealing with a simple picture - a hallway. Creating a hallway or corridor will give you a good idea of how we can create 3 dimensional depth with Photoshop. We'll be creating the separate images and putting them together to form a simple 3 dimensional picture (or painting if you prefer). You may or may not have seen pictures like this before. For me, it reminds me of some of the environments I've seen in a few 3D games I've played. (Except with a much better resolution quality) You won't need to
have a whole lot of understanding of what makes objects look 3 dimensional,
but it will help if you do have a bit of knowledge on the subject. Unfortunately
though that subject can not be covered to any great extent in this small
space, so if after reading a bit of this you feel you are not quite ready
to tackle it just yet, that's fine. |
|
Like puddy in your hands... But in order to better know that we'll have to think of a simple 3D environment first. To me the simplest picture for this example was a small hallway, that I converted into a underground sewer... sort of. The hallway is short and comes to a dead-end that has been boarded over. To understand what I mean just click the title below to take a look at my picture: It's called "No Exit". The steps used to create a picture like this will not be very difficult. And they will help to give you other ideas of things that can be done using only Photoshop. I would also like to note here that for the purpose of this Session the picture we'll be making won't be quite as complex looking as the "No Exit" one. It will be a slight bit more simple like the one at the top of the page. Without the blob of greymatter though of course! ;?) This will help to prevent a lot of confusion and make it easier for people to understand the basic concepts behind creating a picture of this sort. The "No Exit" picture is provided just to give you a rough idea of the extent to which you can use these simple concepts to create a more ellaborate picture. After you've done this Session and had a chance to digest the information for a while, then I encourage you to try a picture of your own design. Ok? |
|
Now lets pick our materials shall we?
The first part I worked on in the picture at the top of the page was
the Floor. So that means we'll need a marble texture pattern. If you have
a favorite you like to use then use it. If you don't have one then go
up to the supplies and get one.
Next we'll want to pick a material for our Walls. I used a brick texture
pattern. Again, if you have a favorite then use that one. If not then
<#supplies>go up to the supplies and get one.
And the last material I used was for the Door that you see in the center
of the picture. For that I just used a wood texture pattern. If you've
got one already... goody for you. ;) If not.... you
know the drill! |
|
Whistle
while you work... When your canvas
comes in do the following steps: Note: Now we'll define
our WALL texture pattern: Now we'll define
our DOOR texture pattern: The order that these
layers were created in is important. The reason being is that for our
picture, the Door must be in front of the other objects. That's why I
had you create that layer last - so it would end up on the top of the
layers palette. Ok that will end Page 1 of the project. |
| "The Photoshop Guru's Handbook" ™ and all contents of this site are copyright 96/00 Mark Anthony Larmand - (aka theKeeper) all rights reserved. |


