|

|
|
Seamless
Background |
|
|
 First open a
new file: 150wide by 150 high.
First open a
new file: 150wide by 150 high. |
|

|
 Paste a texture into the
file, or you may save my texture. To save it, Right Click and choose "Save
As" to download (Mac: Press and hold mouse button on the image, Select
Save from the popup menu).
Paste a texture into the
file, or you may save my texture. To save it, Right Click and choose "Save
As" to download (Mac: Press and hold mouse button on the image, Select
Save from the popup menu).
 Select>All.
Now Image>Crop. This gets rid of any excess data outside the
canvas.
Select>All.
Now Image>Crop. This gets rid of any excess data outside the
canvas.
|
|
|
 Now go to
Filter>Other>Offset. For Horizontal Enter 75 and Vertical
enter 75. The value is always half of one direction, so if the image was
50x50, then the offset would be 25x25. Now go to
Filter>Other>Offset. For Horizontal Enter 75 and Vertical
enter 75. The value is always half of one direction, so if the image was
50x50, then the offset would be 25x25. |
|

|
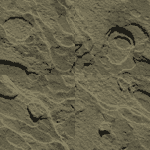
 In most
images you should now see seams. We need to cover them up. After we do,
then it becomes a pattern. An easy way to cover up the seams is with the
Rubber Stamp Tool. Select this tool from the tool bar. In most
images you should now see seams. We need to cover them up. After we do,
then it becomes a pattern. An easy way to cover up the seams is with the
Rubber Stamp Tool. Select this tool from the tool bar.
|
|
|
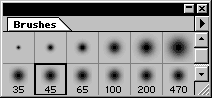
 Choose a soft
brush, about 45 to 65 pixels wide. Make sure Caps Lock is off so you can
see the brush radius. Choose a soft
brush, about 45 to 65 pixels wide. Make sure Caps Lock is off so you can
see the brush radius.
 |
|
|
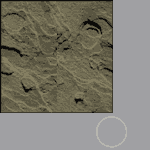
 Hold down the Alt
key (Mac: Option) and click on a spot of the image and then release
the Alt key and click once more on the seam to cover it. By holding down
the Alt key and clicking, you copied a spot on the image, then by clicking
again over the seam you paste it. A soft brush is used to make it blend
more. Hold down the Alt
key (Mac: Option) and click on a spot of the image and then release
the Alt key and click once more on the seam to cover it. By holding down
the Alt key and clicking, you copied a spot on the image, then by clicking
again over the seam you paste it. A soft brush is used to make it blend
more. |
|

|
 To save this image as a GIF
file for the web, go to File>Save to Web and compress
it. To save this image as a GIF
file for the web, go to File>Save to Web and compress
it.
|
 |
Testing out the pattern
This is something you might want to consider after you have
finished the pattern.
1. After you have covered the seams, Select the
image: Select>All. Now go to Edit>Define Pattern.
2. Open a new image, make this one much larger
like around 500x500 Pixels.
3. Next, to see what the pattern looks like, go
to Edit>Fill. Select "Pattern" where it says "Use" and click ok.
This should fill the image with the pattern. |
 |
|
|
Home | Site Map | Search | Tips | Store |
Free | Resources | Community | About | Email
Designs By Mark.com. ©
1997 - 2000 Mark Monciardini All Rights Reserved.
|
